Giving Life to Legacy Apps with Docker
With aging applications and infrastructure, transitioning to the Cloud doesn’t have to involve refactoring or rewriting of code. In this article, I will walk you through one way to perform how to make the transition.


With aging applications and infrastructure, transitioning to the Cloud doesn’t have to involve refactoring or rewriting of code. In fact, using virtual machines (VM) in the Cloud might seem like a viable option for transition without refactoring, but it doesn’t leverage the true benefits of being in the Cloud. By using Docker containers to package up an application, organizations can shift to the cloud with no code changes while leveraging increased security, auto-scaling, and self-healing capabilities. In this article, I will walk you through one way to perform this transition.
Containerizing an Application
If a build system already exists for an application, the best method for a first iteration is to create a container image that has the build artifacts copied in. If a build system doesn’t exist, creating a multi-stage build is likely the best approach but also sligthly more advanced.
Dockerfile
Here’s a Dockerfile (a script that defines how a container image is created) that shows how to create a container image and copy in the build artifacts for an application. The end result is a container image that can be run your application in the Cloud or on your local machine if you wish.
FROM ubuntu:latest
COPY ./artifacts /app
CMD /app/startup.sh
On line 1 of the Dockerfile, the latest release of Ubuntu is being chosen as the operating system for running he application. The neat part here is that many OS images are regularly updated with patches, so you won’t ever have to think about OS patches as long as you deploy often enough (which I recommend via a CI/CD pipeline). On line 2, the artifacts of an application are being copied in to the /app folder in the container. If the artifacts of a build are on a shared network location, then using something like RUN wget -r https://myartifacts.com/artifacts will do the trick. Finally on line 3, the default command that will be called when this container runs will execute startup.sh (though this can be overridden).
Build the Container Image
The command to make use of the Dockerfile is going to look something like this: docker build -t <docker hub username>/<container name>:<version tag> . (Note the ‘.’ at the end).
The -t specifies the tag that will be given to this container image. This tag is how the image is referred to when interacting (more on this later). For naming and versioning a container, it is common to name with the name of the application and to version with a date.
Storing the Container Image
Once a container image is created, it needs to be placed in a container registry that can be accessed by the infrastructure that will be serving the application. Assuming that an account exists on Docker Hub, the command to push the newly created contianer image to Docker Hub will be docker push <docker hub username>/<container name>:<version tag>. Once this is complete, the application is now ready to be deployed.
Deploying
There are several of offerings for running containers in the Cloud, but Microsoft’s Azure is my Cloud of choice for many reasons. Within Azure, there are at least 5 services to which a container can be deployed (probably more, but it took me less than 10 seconds to think of those 5). The service that I will focus on in this article is the Azure Container Instance.
Testing Locally
To test or play with the container locally before deploying to ensure that it is operating as expected, the base command is going to be something like this: docker run -it --rm <docker hub username>/<container name>:<version tag>. Depending on the specific situation, other options might need to be specified. Once verified, the container can be deployed with confidence.
How to Deploy
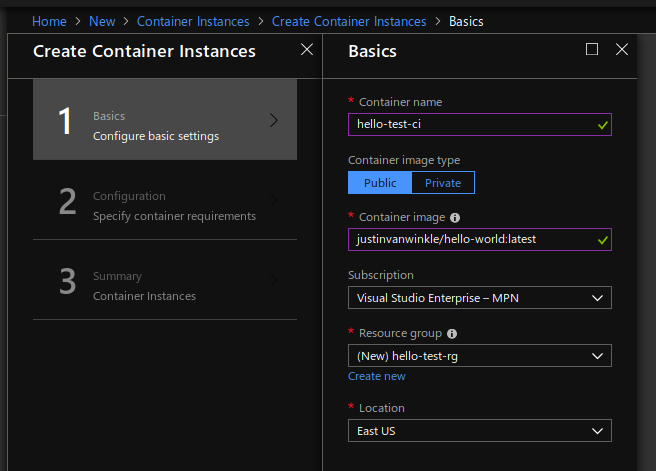
Container instances are dead simple for deploying containers. All that is necessary is an active Azure subscription. To create the container instance, open the Azure Portal and select Create a resouce in the top left corner. Select Containers and then Container Instances. At this screen, set Container name to be what this resource should be called. Set the Container image field to <docker hub username>/<container name>:<version tag>, select Private if your image is not publicaly accessible and enter your registry credentials. Once all of the fields have been filled out, select OK.
On the next screen (Configuration), set these options in a way that make sense for the application being deployed. At this point, the Container instance is ready to be created. Select OK a few more times.
Checking out the Deployed Service
Now the service is deployed, so it’s time to test it out. If your service has a REST api, the IP address and domain name can be obtained in the Azure Portal on the page for the container instance.
Wrapping Up
This article has shown the general method for transitioning an application to the Cloud. There are many offerings out there and some will make more sense and have more service offerings suited to your applications needs. Don’t be afraid to try them out – they are all great in their own ways.
More Resources
If this article has piqued your interest, here are some resources that you might benefit from:
- Azure’s container offerings: https://azure.microsoft.com/en-us/overview/containers/
- Nebbia Technology - They can help you determine and execute a transition plan: https://www.nebbiatech.com/


